

Intro [^]
What if you don't have a spare local disk or partition or a USB disk? How will you be able to get a backup of your system? Well, if your PC is on the same LAN with another PC running Windows (or linux), you can use Samba to save your image file on that remote PC (which we will call Samba server from now on).
Using Samba you will be able to mount a Windows share resource (or Samba share resource), from within Clonezilla Live, and save the image file there. Then you can boot that PC using SystemRescueCD and create a restore DVD.
In this page I will demonstrate the creation of an image file by getting a backup of my second disk (/dev/sdb). The image file will be save in my Samba server which is my laptop (ip: 10.0.0.3, Windows share resource name: all_my_images).
What is Samba? [^]
We read at http://us1.samba.org/samba/:
Samba is an Open Source/Free Software suite that provides seamless file and print services to SMB/CIFS clients. Samba is freely available, unlike other SMB/CIFS implementations, and allows for interoperability between Linux/Unix servers and Windows-based clients.
Samba is software that can be run on a platform other than Microsoft Windows, for example, UNIX, Linux, IBM System 390, OpenVMS, and other operating systems. Samba uses the TCP/IP protocol that is installed on the host server. When correctly configured, it allows that host to interact with a Microsoft Windows client or server as if it is a Windows file and print server.
Gathering info [^]
Before you can use this approach to get a backup, you have to get some info about the Samba server.
The Samba server I have used for this example was my laptop, so I already knew most of the info required. If this is not the case for you, just ask the owner, user or system admin.
The info required is:
- The IP address of the Samba server
- The domain on the Samba server
This may exist if your PC is connected to a larger LAN (a corporation network, for example). In my case this is empty. - The user name and password you can use
- The directory on the Samba server you can use to save your backup
This is the name of the Windows share resource (Samba share resource) as it is known in the network, which is not necessarily the same as the local directory name. The user whose account will be used to login to the Samba server, must have write permission to this directory.
Getting the backup [^]
If you're fine with US keymap and English language (available languages are English, Spanish, French, Italian, Japanese and Chinese [both simplified and traditional]) or don't mind editing the boot parameters, just select Clonezilla Live at the starting screen and press ENTER. When the system comes up, it will load the program that will preform the backup.
If you need to change these settings, go to the Getting backups page for instructions .
Screen "Start Clonezilla" [^]
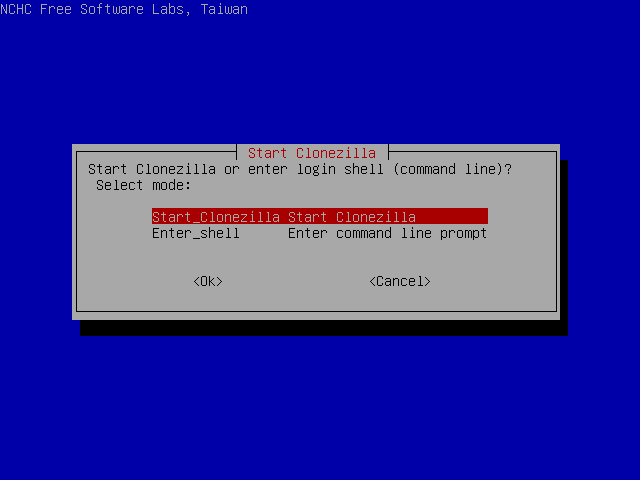
I select "Start Clonezilla" and press ENTER.
Screen "Clonezilla" [^]
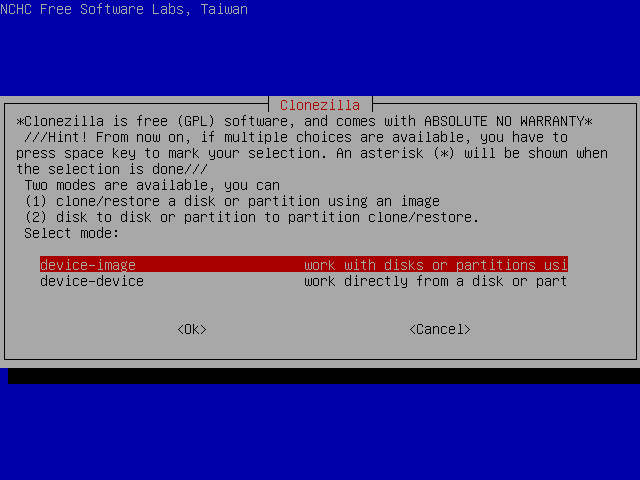
I select "device-image" and press ENTER.
Screen "Mount clonezilla image directory" [^]
In this screen I can select the way the image file directory will be saved.
Available options are local directory, remote directory through ssh, samba or nfs and skip, to use the previously used directory. More info about the image file can be found at section "About the Image file".
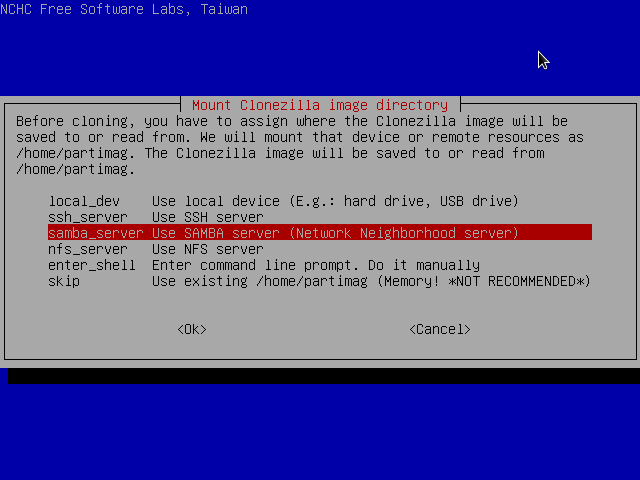
I select "samba server" and press ENTER.
Screen "Mount Samba Server" [^]
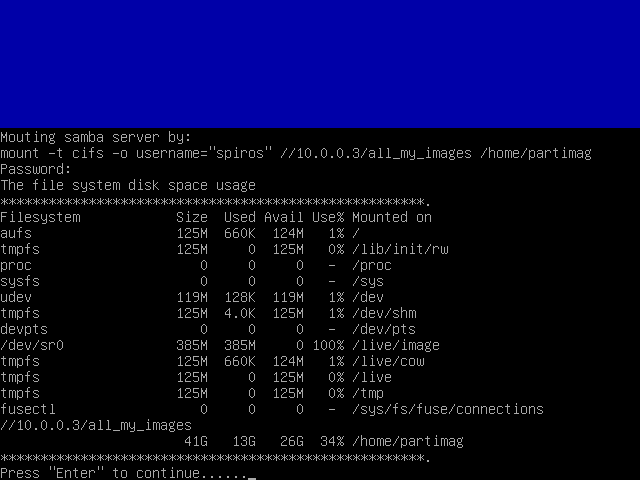
This is where I have to enter the IP address of my Samba server.
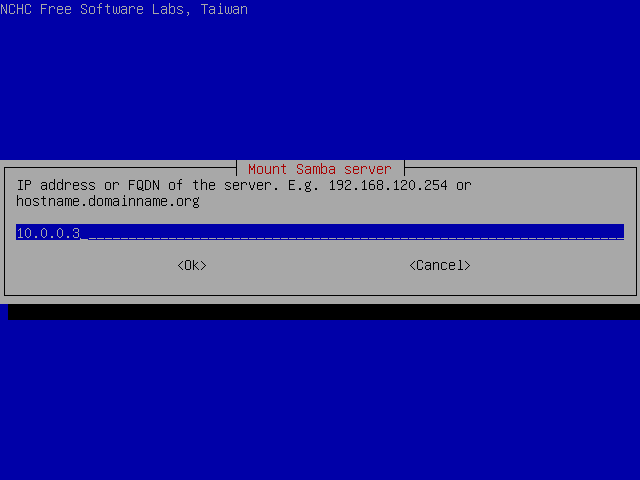
I type "10.0.0.3" and press ENTER.
Screen "Mount Samba Server" (second time) [^]
This is where I have to enter the domain name on my Samba server.
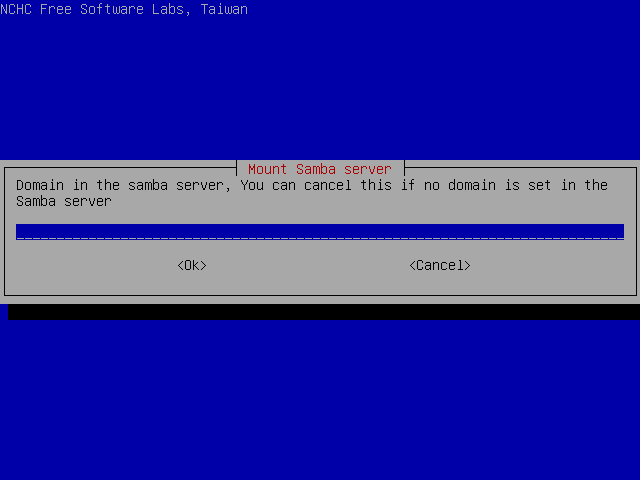
I just press ENTER, as there is no domain in my LAN. If there is a domain in your network, you have to type its name (something like my_company.com) and press ENTER.
Screen "Mount Samba Server" (third time) [^]
This is where I have to enter the account (user) name on my Samba server.
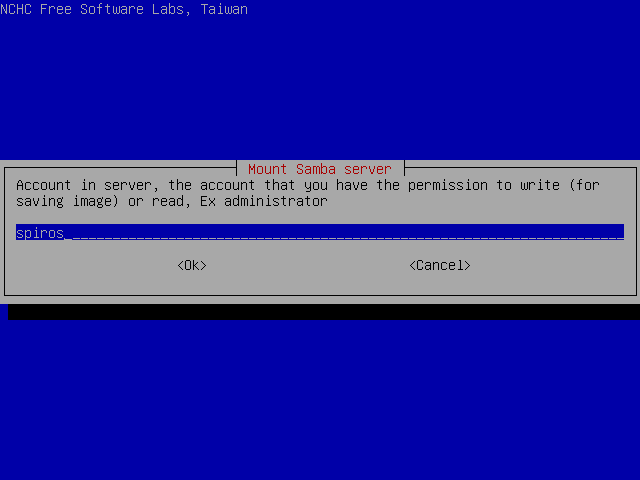
I type "spiros" and press ENTER.
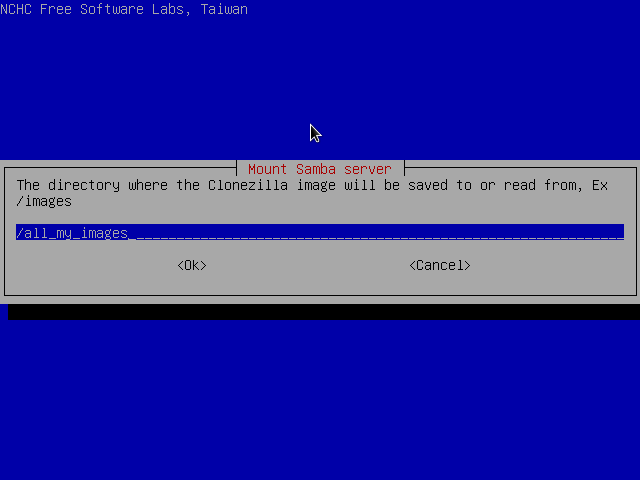
Screen "Mount Samba Server" (fourth time) [^]
This is where I have to enter the directory name on my Samba server, in which the image file will be saved.
I type "/all_my_images" and press ENTER.
At this point I'm informed I'm going to be asked for the password for user spiros.
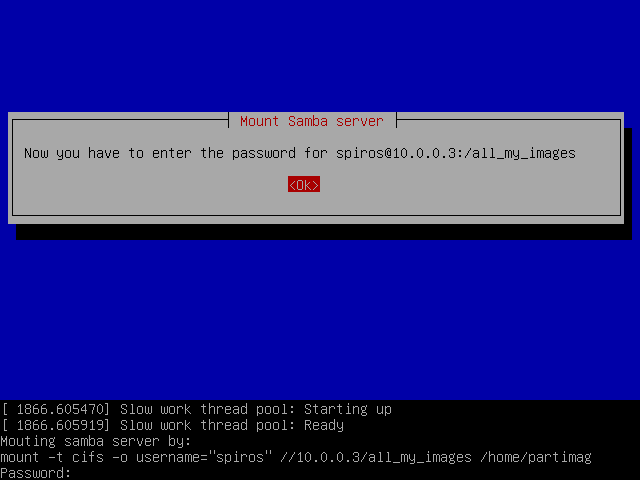
I will be able to continue only after entering it correctly.
Screen "Clonezilla - Opensource Clone System (OCS)" [^]
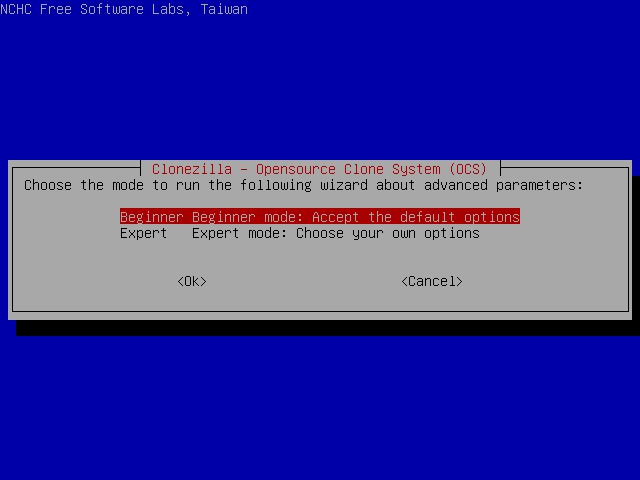
I select Beginer mode to accept the default backup options. If you select Expert mode, you can choose the options yourself. More details can be found here.
Screen "Select mode" [^]
Here I can select the desired operation.
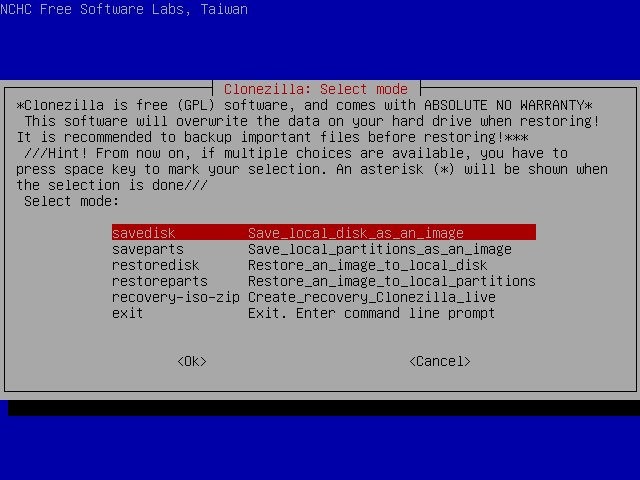
I select "savedisk" and press ENTER.
Next Screen [^]
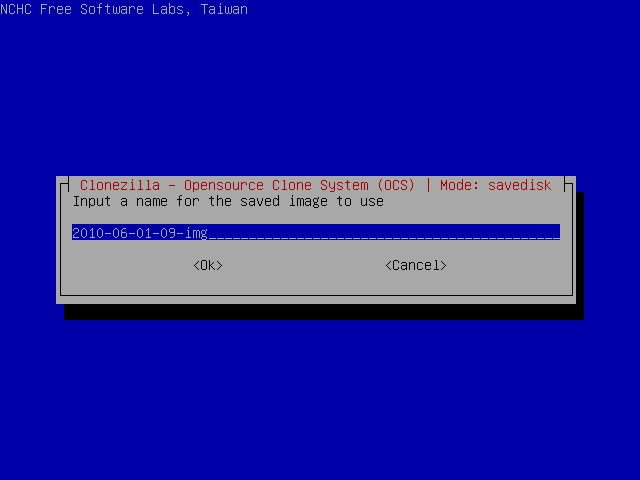
In this screen I select the image name.
I type "Backup_32-2010_sdb", which in my opinion is more informative name than the default.
Next Screen [^]
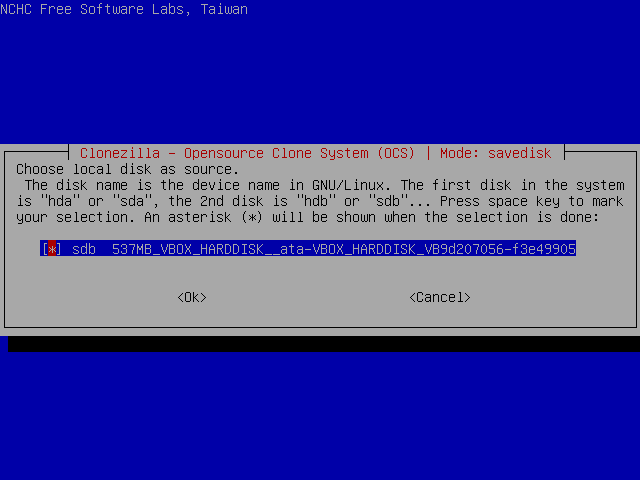
Finally I am asked to select the partition to save.
I just press ENTER again.
Starting the backup [^]
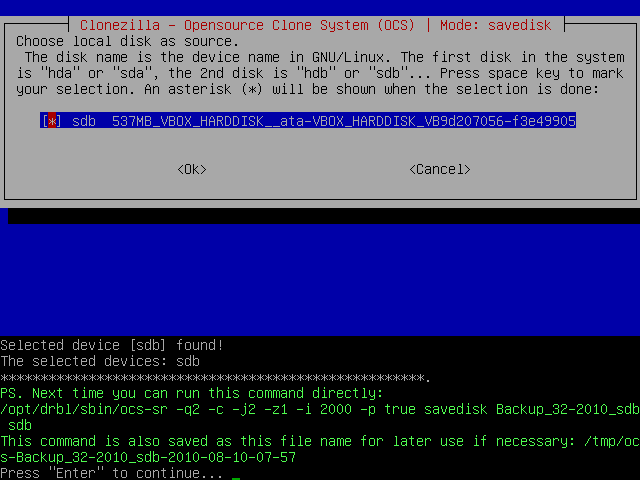
Then the program will display the command that will be executed and will ask me to press ENTER.
Then I will be asked to confirm the operation by pressing y and ENTER.
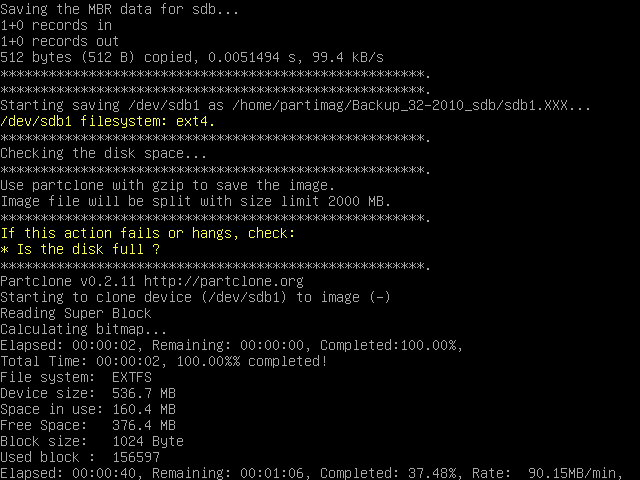
After that, the backup begins
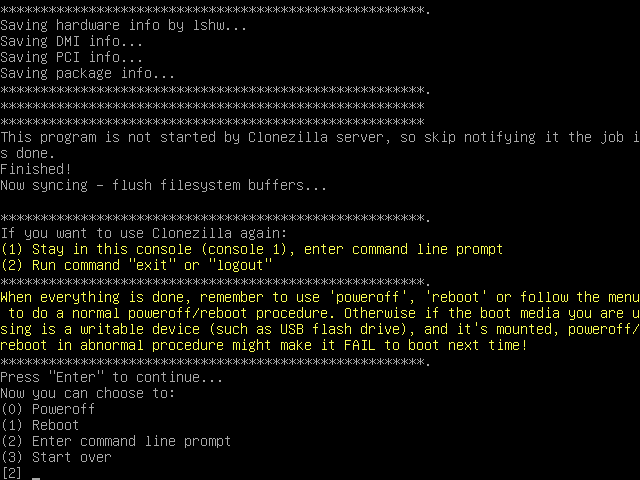
and when it's successfully completed, I press ENTER to get to the shell. Then, I execute the commands:
sudo su -
cd
umount -a
reboot
to reboot the system.